
How to Wash a Hat in the Dishwasher Without Ruining It
The Ultimate Guide: How to Clean Hats in the Dishwasher
We all have that one favorite hat. It is the go-to baseball hat that fits perfectly, has the brim curved just right, and represents your favorite team, brand, or memory. It is the hat you grab for a Saturday barbecue, a morning run, or a day working in the yard. But after months of wearing it, that beloved cap starts to show signs of wear. Sweat stains appear along the brim, dirt accumulates on the logo, and it might even develop a less-than-pleasant odor.
You want to clean it, but you are hesitant. We have all heard the horror stories of hats being thrown into a standard washing machine, only to come out misshapen, crumpled, or with a broken brim. The agitation of a standard laundry cycle is simply too rough for the structure of a baseball cap, often crushing the crown and ruining the fit. However, scrubbing the entire thing manually is tedious, and sometimes you just don't have the time to wash a hat by hand.
This is where your kitchen appliances come to the rescue. Learning how to clean hats in dishwasher racks is a game-changer for hat enthusiasts. This method allows the appliance to act as a gentle, controlled steam cleaner. It sanitizes your headwear using warm water and spray arms without the tumbling action that destroys the hat's structure.
At A+ Appliance Repair and Maintenance, we know appliances inside and out. We have compiled this comprehensive, step-by-step guide to help you restore your caps safely using your dishwasher, while also helping you identify when it is safer to stick to traditional methods.
Part 1: The Anatomy of a Baseball Hat or Baseball Cap (What Can You Wash?)
Before you open the dishwasher door, you must act as a detective. Not all hats are created equal, and putting the wrong material in a dishwasher can lead to irreversible damage. The heat and water pressure are great for some materials but disastrous for others.
The "Cardboard vs. Plastic" Test
The most critical factor in deciding whether to use the dishwasher or wash a hat by hand is the material inside the brim (the stiff part that shades your eyes).
- Vintage Hats (Pre-1990s): If you have a vintage cap or a cheaper promotional hat made before the early 1990s, the brim is likely made of compressed cardboard or paperboard. If you expose this to the intense water spray of a dishwasher, it will absorb the moisture, turn into mush, and lose its shape forever. Do not dish-wash these.
- Modern Hats: Most caps made in the last 30 years use a durable plastic insert in the brim. These are designed to withstand moisture and are generally safe for the dishwasher.
- The Tap Test: Not sure what you have? Tap the brim with your fingernail. If it makes a solid, hollow "click" sound, it is likely plastic. If it sounds dull, feels bendable, or seems soft, it might be cardboard. If you suspect cardboard, you must wash that hat by hand using a damp cloth only.
Fabric Check: Read the Label
Check the care label inside the sweatband for fabric composition.
- Safe Materials: Cotton blends, polyester, nylon, and jersey mesh are typically safe. These synthetic and durable natural fibers can handle warm water and mild agitation.
- Unsafe Materials:
- Wool: Wool fibers shrink significantly when exposed to heat and water.
- Felt: Felt will pill, fuzz, and warp.
- Leather/Suede: Water will dry out the natural oils in leather, causing it to crack and stiffen.
- Silk: Too delicate for spray jets.
For any of these "unsafe" materials, skip the appliance entirely. The only safe method is to carefully wash the hat by hand.
Part 2: Essential Tools for the Job
While you can wash a hat loose on the rack, we strongly recommend using specific tools and cleaning agents to ensure the best results and protect your appliance.
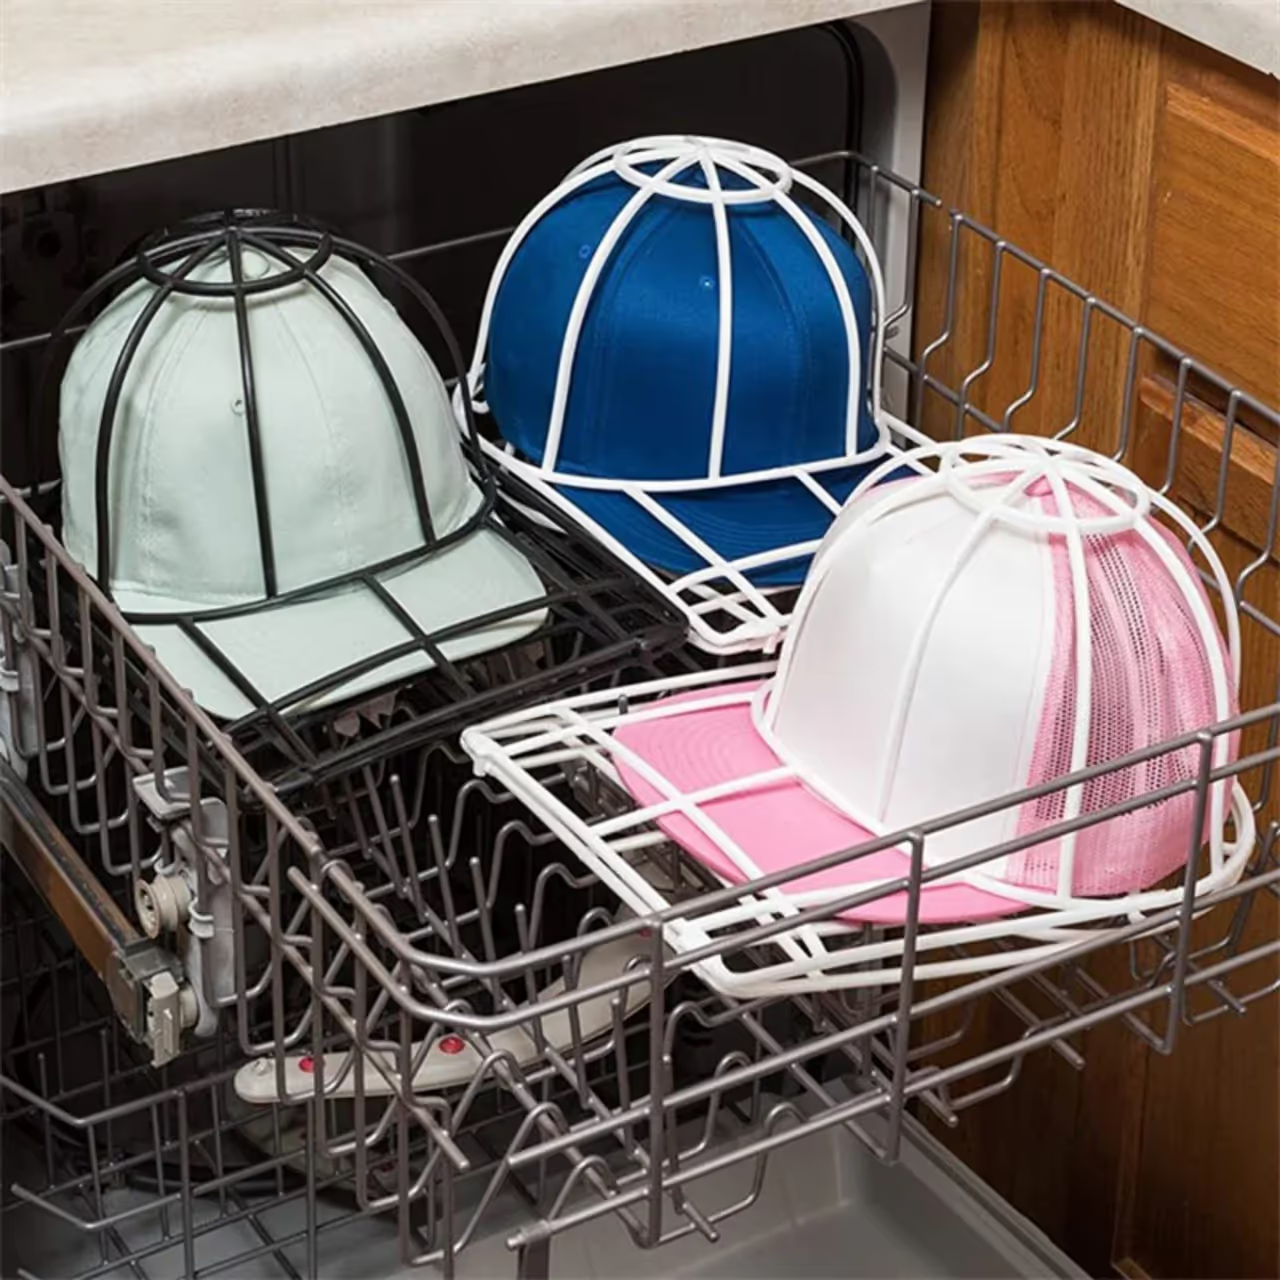
The Importance of a Hat Cage
To guarantee your hat keeps its perfect curve and dome shape, you should invest in a hat cage. This is a plastic frame that snaps around your cap, locking the brim and the crown in place.
A hat cage creates a protective barrier, ensuring that the water jets clean the fabric without the force of the water knocking the hat around or flattening it against the racks. If you wash hats frequently, a hat cage is an inexpensive investment that pays for itself by saving your expensive headwear from being ruined. If you absolutely cannot get one, you can proceed without it, but you will need to be much more careful about placement.
Choosing the Right Cleaning Agents
This is where many people make mistakes that can ruin their appliance. Your dishwasher is designed for ceramics and glass, not fabric, and it functions differently than a washing machine.
- No Laundry Detergent: You might be tempted to pour a small amount of laundry detergent into the dishwasher soap dispenser. Do not do this. Laundry detergent is chemically formulated to create high volumes of suds and foam. Dishwashers are not designed to handle suds; if you use it, foam will overflow from the machine, leaking onto your kitchen floor and potentially damaging the pump and electronics.
- Avoid Bleach: Many dishwasher tabs contain bleach additives to make glass sparkle. Bleach will ruin the color of your hat immediately, leaving you with splotchy white patches.
- Avoid Citric Acid: Lemon or orange-scented detergents often contain citric acid, which can eat away at cotton fibers over time.
The Solution: Look for a mild detergent made for dishwashers that is free of dyes, perfumes, and bleach. Alternatively, you can use a specific hat-cleaning solution compatible with dishwashers. Borax is another additive that can help boost cleaning power without creating suds.
Part 3: Step-by-Step Guide to Washing Your Hat
Ready to get started? Follow this expert process to get your caps looking brand new.
Step 1: Pre-Treating Deep Stains
The dishwasher relies on water spray, which is great for general cleaning but might miss ground-in dirt on the sweatband. Before running the cycle, give the hat some attention.
- Inspect the inner rim of the hat where it touches your forehead. This is where sweat, skin oils, and sunscreen accumulate.
- Create a paste using a small amount of warm water and a mild detergent (like a gentle dish soap) or baking soda.
- Gently scrub the sweatband with a soft-bristled toothbrush to loosen the grime.
- Note: While we advised against putting laundry detergent in the machine, you can use a small amount of liquid laundry detergent to spot-clean a stubborn stain on the fabric manually before putting it in the dishwasher. Just ensure you rinse that specific spot thoroughly so no sudsing agents remain before the wash cycle begins.
Step 2: Load the Hat Correctly
Proper placement is non-negotiable for safety.
- Top Rack Only: Always place your hat on the top rack. The heating element in a dishwasher is located at the bottom. The heat generated there is intense enough to melt the plastic brim insert or shrink the fabric. The top rack is the "cool zone" and keeps the hat away from the most aggressive water jets.
- Securing the Hat: If you have a hat cage, snap the hat inside and place the cage upright on the top rack. If you do not have a cage, place the hat over the vertical tines (prongs) of the rack to help keep the dome shape. You can use a rubber band to loosely secure the adjustable strap to a prong so the water pressure doesn't blow it off the rack.
Step 3: Input Your Settings
Modern dishwashers have high-intensity settings for pots and pans—you want to avoid these at all costs.
- Temperature: Select "Warm" or "Cold." Do not use "Sanitize," "High Temp," or "Steam Clean" options. These temperatures are designed to kill bacteria on glass, but they are too high for the glues and plastics used in hat construction.
- Cycle: Choose the shortest, gentlest cycle available. This is usually labeled as "China," "Crystal," "Light Wash," or "Quick Wash."
- Dry Cycle (Critical): Turn OFF the "Heated Dry" option. The drying coil at the bottom of the dishwasher gets incredibly hot to evaporate water from plates. This heat will bake your hat, shrinking it and warping the brim permanently.
Step 4: Run the Wash
Start the dishwasher. Ideally, you should wash the hat alone or with a very light load of lightly soiled plastic items (like Tupperware).
Warning: Do not wash your hat with greasy pots, spaghetti plates, or silverware. The grease and food particles can transfer onto the fabric of the hat, leaving you with a worse stain than when you started.
Part 4: The Post-Wash Process (Drying and Reshaping)
The cycle is done, and your hat is wet and clean. What you do now determines the final look.
- Remove Immediately: Do not let the hat sit in the damp, humid dishwasher for hours. This can encourage mildew growth in the thick fabric of the sweatband.
- Shake it Out: Gently shake the hat to remove excess water.
- Reshape: If you used a hat cage, you can leave the hat inside the cage to air dry. This is the absolute best way to ensure it retains its shape. If you don't have a hat cage, you need a makeshift form. An upside-down coffee can, a small mixing bowl, or even a balled-up small towel stuffed inside the crown works wonders. This supports the fabric as it dries so it doesn't collapse or wrinkle.
- Air Dry Only: Place the hat in a well-ventilated area out of direct sunlight. Sunlight can fade the wet fabric. Never, under any circumstances, put the hat in a clothes dryer. The tumbling and heat will destroy it.
Part 5: Troubleshooting (Why Is My Hat Still Dirty?)
Washing a hat is actually a fantastic stress test for your dishwasher. Because fabric holds onto dirt differently than smooth ceramic plates, a hat wash can reveal hidden issues with your appliance.
If you followed all the steps—used a mild detergent, placed it on the top rack, and pre-treated stains—but the hat came out looking dingy or covered in grit, your dishwasher might be malfunctioning.
Common Dishwasher Issues Revealed by Hat Washing
1. Clogged Spray ArmsThe dishwasher cleans by spraying water through small holes in the rotating arms. If these holes are clogged with calcium deposits, seeds, or food bits, the water pressure drops significantly. Your hat won't get clean, and neither will your dishes.
2. Dirty FilterAt the bottom of your dishwasher, there is a filter basket designed to catch food particles. If this is full, the machine ends up recirculating dirty water. This often results in "sand" or grit getting trapped in the fabric weave of your hat.
3. Failing PumpIf the water isn't draining fast enough or circulating with enough force, the detergent won't dissolve properly. This can leave a soapy residue on the bill of your cap.
4. Cold Water SupplyEven though we recommend avoiding "Sanitize" temps for hats, the water still needs to be warm enough to activate the detergent. If your dishwasher's heating element is broken or the inlet valve isn't supplying hot water, the wash will be ineffective.
Summary: Dishwasher vs. Hand Washing
To recap, choosing the right method is key to longevity.
- Dishwasher Method: Best for modern, synthetic or cotton-blend baseball caps with plastic brims. It provides deep cleaning and sanitization with minimal effort. Requires a hat cage for best results and must be done with specific dishwasher detergent, never laundry detergent.
- Hand Washing: Best for vintage hats, wool, felt, leather, or hats with cardboard brims. Washing a hat by hand is the safest, gentlest method, but it requires more time, physical scrubbing, and patience.
When to Call the Professionals
Taking care of your appliances allows them to take care of your belongings—from your favorite coffee mug to your lucky baseball hat. If you notice that your dishwasher is struggling to clean your hats, leaving puddles of water, or making strange grinding noises, it is time for a check-up.
At A+ Appliance Repair and Maintenance, we understand the importance of a fully functioning home. We specialize in diagnosing and fixing all major dishwasher brands, ensuring they run efficiently and effectively. Whether it is a clogged pump, a broken latch, or a motor issue, our certified technicians can solve the problem fast.
Don't let a broken appliance ruin your laundry or your dishes. Contact us today to schedule a service appointment. We will get your dishwasher back to peak performance so you can keep your hats—and your kitchen—sparkling clean.


.svg)


.avif)


.svg.avif)

.avif)
.avif)


.avif)


.avif)


.avif)

.avif)

.avif)


.avif)
.avif)
.avif)
.avif)
.avif)
.avif)
.avif)
.avif)
.avif)